Making an MLA Paper with Google Docs
Google Docs is a word processor which is available free for everyone who has a Gmail account.
Getting Started
Blackboard and Google Docs really love the Chrome web browser best, so if you don’t have it yet, follow this link to download and install it.
Google Docs saves files automatically to the Google Drive. To minimize confusion, we’re going to enter Google Docs by starting in Google Drive, beginning with the place where you want your file to land.
- Open your Gmail account (not your Ashland account).
- Click the “Apps” icon apps in the upper right.
- Click the “Docs” icon (It looks like a little blue typed page).
- Under “Start a new document” click the Report MLA template.
- Google has already automatically saved your document under the title “Report.” You want a better title, so double-click the word “Report” in the upper left and choose a title that will help you find this document in the future.
- Double-click on the left of the page number and type your own last name, followed by a space.
- That page number is in the header (something that repeats on every page). To get into the body of the document, just click anywhere down below.
- Triple-click “Your Name” on the left and type in your own name (first and last).
- Triple-click “Professor Name” and type the name of your teacher.
- Triple-click “Subject Name” and type in the name of your course (for example, English 100-A).
- Triple-click “04 September 20XX” and type the date this paper will be submitted.
- Triple-click “Title of Your Report” and type the title of your paper.
- Now you need to delete all that “Lorem ipsum” gibberish and begin typing your paper.
- If you will need a Works Cited page, place your cursor at the very end of the paper body and drop the “Insert” menu down to “Break” and choose “Page break.”
- Type the words Works Cited and tag that paragraph with the “Title” paragraph style.
- Type your Works Cited entries (each one as a separate paragraph and alphabetized). Then tag them all with the “Normal text” style.
- Highlight the Works Cited entries, then drop the “Align & indent” menu down to “Indentation options” and use these settings: Left: 0, Right: 0, Special indent: Hanging 0.5
The program will automatically figure out line endings and page endings, and will place the page number at the top of each new page.
Two More Refinements
Long quotations
MLA requires you to indent long direct quotations (four lines or more). Here is how to do it:
- Before the long quotation begins, press the <Return/Enter> key to start a new paragraph.
- Type the quotation but don’t put quotation marks around it.
- Finish with a period, then put in your parenthetical citation.
- Press the <Return/Enter> key to start a new paragraph.
- Type at least a little bit of the following material.
- Highlight the quotation and tag it with “Normal text”
- Drop the “Align & indent” menu down to “Indentation options” and use these settings: Left: 0.5, Right: 0, Special indent: None
Managing the Paragraph Styles
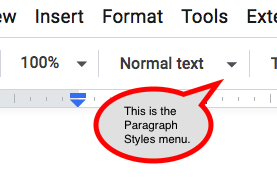
Google Docs has three problems with its paragraph styles. The first is that there just are not very many of them, the second is that you cannot add new styles, and the third is that the styles do not always define horizontal indents. This means that “Normal text” is used for nearly all the content and horizontal indents are often defined by modifying the ruler. (“Normal text” now seems to default to a ½" first line indent.)
If you modify a paragraph, then start a new paragraph by pressing the Return/Enter key, the new paragraph will have the same indents and other characteristics as the one you just finished.
In the list below, I will give you quick shortcuts for tagging paragraphs. If a tag must be modified, highlight the paragraph, then drop the “Align & indent” menu down to “Indentation options” and use the settings I provide in square brackets.
- Page number: Normal text (Align right)
- Student name block: Normal text [Left: 0, Right: 0, Special indent: None]
- Paper title: Title
- Body paragraphs: Normal text [Left: 0, Right: 0, Special indent: First line 0.5]
- Indented long quotation: Normal text [Left: 0.5, Right: 0, Special indent: None]
- Works Cited page title: Title
- Works Cited page entries: Normal text [Left: 0, Right: 0, Special indent: Hanging 0.5]
Downloading Your Paper for Blackboard
Google Docs saves everything in its own online format, and you cannot simply send a link to someone else and hope for them to open it, so if you want to submit through Blackboard, you need one more step:
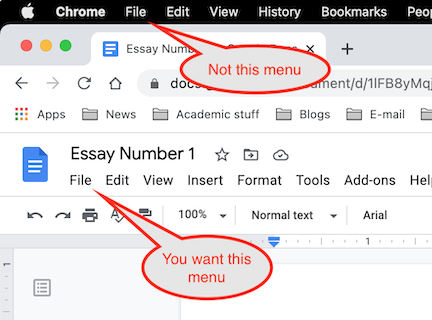
- Click the File drop-down menu.
(Google Docs confusing moment: If you are using an Apple computer, you may see two drop-down menus called “File.” You want the lower one, just below the name of your essay.)
- Click Download >
- Click Microsoft Word (.docx)
- The downloaded file will probably land in your “Downloads” folder with the same name you specified for this file plus a docx extension. This is the file you will be uploading to Blackboard.
The views and opinions expressed in this page are strictly those of the page author.
The contents of this page have not been reviewed or approved by Ashland University.
Revised 6/1/24 • Page author: Curtis Allen • e-mail: callen@ashland.edu.